Enabling SNMP
The SNMP agent on this device is disabled by default. Enable the agent to allow SNMP hosts and management stations to connect with this device.
1. Click on the chassis and select the SNMP tab.
2. Select the SNMP enabled checkbox, highlighted in the Şekil below.
3. Click Review/apply and review pending changes. To apply these changes to the system, click Apply changes or click ‘X‘ to cancel.
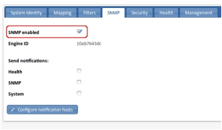
SNMP enabled checkbox (highlighted)
SNMP versions and workflow
This device functions as an SNMP agent and supports SNMP v1, v2, and v3. It also reports system events to trap receivers using the traps defined in the MIB that it supports.
SNMP v1 and v2
To control access to the system, a list of community entries is defined. Each community entry consists of a community string and its access privilege. Only SNMP messages with the suitable community string and operation are responded to by the system.
SNMP agents maintain a list of variables that are used to manage the device. The variables are defined in the Management Information Base (MIB). The MIB presents the variables controlled by the agent.
SNMP v3
In addition to the functionality provided by SNMP v1 and v2, SNMP v3 applies access control and new trap mechanisms to SNMPv1 and SNMPv2 PDUs. The SNMPv3 architecture introduces the User-based Security Model (USM) for message security. The security features of USM include:
- Authentication—Provides data integrity and data origin authentication.
- Privacy—Protects against disclosure message content. Cipher Block- Chaining (CBC) is used for encryption. Either authentication alone is enabled on an SNMP message, or both authentication and privacy are enabled on an SNMP message. However, privacy cannot be enabled without authentication.
- Timeliness—Protects against message delay or playback attacks. The SNMP agent compares the incoming message time stamp to the message arrival time.
- Key Management—Defines key generation, key updates, and key use. The device supports SNMP notification filters based on Object IDs (OID). OIDs are used by the system to manage device features.
For access control, the SNMPv3 architecture introduces View-based Access Control Model (VACM). VACM provides more robust privacy and authentication mechanisms over previous versions, and allows for more flexibility in both user configuration and view configuration.
VACM can also deal with cases where a client wants to connect using SNMPv1/v2. For these clients the SNMPv1/v2 community string is mapped onto a “security name” and added to a group, just like SNMPv3 users.
SNMP workflow
SNMP v1 and v2 workflow:
If you decide to use SNMP v1 or v2, define a community by using the Add communitydialog. ConŞekil the access rights of a community as read-only or read-write. In addition, you can restrict the access to the community to only certain MIB objects by specifying an OID.
SNMPv3 workflow:
In SNMPv3, users are organized into groups and are useless unless included in a group. A group is a label for a logical entity (combination of attributes). A group is operational only when it is associated with an SNMP user or an SNMP community. A group also has an attribute that tells if members should have read, write, and/or notify privileges for the view. If you decide to use SNMP v3, the recommended series of actions for configuring is as follows:
1. Define the users and their access models.
2. Map any SNMP v1 communities to a security name.
3. Create groups.
4. Define the views that the group will be restricted to.
5. Define an access policy for the group.
Traps and notifications management for SNMP v1, v2, or v3:
This device is able to send traps and notifications to registered SNMP notification recipients. To set up traps and notifications:
1. Enable or disable the required Send notifications checkboxes.
2. Define notification recipients by using the ConŞekil notification hosts dialog.
SNMP Engine ID
This device uses a fixed SNMP Engine ID which cannot be changed. The Engine ID is used by SNMPv3 entities to uniquely identify them to other SNMP managers and agents and must therefore be unique for an administrative domain.
To view the Engine ID, select the SNMP tab. The Engine ID location is highlighted in the following figure.
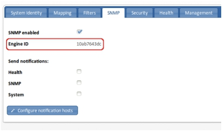
The SNMP Local Engine ID
Defining notification (trap) settings
The Send notifications checkboxes allow you specify which SNMP notifications to send from this device. The recipients of the SNMP notifications can be configured in the SNMP Notification Hosts dialog (see the Şekil below).
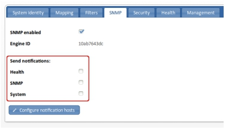
The SNMP Send notifications options (highlighted)
Specifying send notifications
1. Click on the chassis and select the SNMP tab.
2. Using the Send notifications options, select the notifications you want to send to your notification hosts from this device. The following notifications are available:
- Health—the following events will trigger a Health notification:
- System temperature above threshold (nctapNotifySysTemperature)
- Power on/off (nctapNotifyPower)
- Fan on/off (nctapNotifyFan)
- SNMP—the following events will trigger an SNMP notification:
- System cold boot (coldStart)
- System restarted (warmStart)
- SNMP authentication failure (authenticationFailure)
- System—the following events will trigger a System notification:
- Port link-up state (linkUp)
- Port link-down state (linkDown)
- Data rate above high threshold (nctapNotifyXSTrafficOver)
- Data rate below low threshold (nctapNotifyXSTrafficUnder
- Failed login attempt (ncUnauthorisedAccess)
3. Click Review/apply and review pending changes. To apply these changes to the system, click Apply changes or click ‘X‘ to cancel.
Configuring notification hosts
1. Click on the chassis and select the SNMP tab.
2. Click Configure notification hosts.
3. To add a new host, click Add new notification host, or to edit an existing host click the edit icon that is next to the required host. The Add/Edit notification host dialog displays
4. Enter or edit details for the notification host:
- Destination – Enter a location for the notification host in the following format: {protocol}:]{host}[:{port}] where protocol can be udp or udp6; host can be a hostname or an IPv4 or IPv6 address; port is the UDP port on the host
- SNMP version – Choose whether notifications are to be sent using SNMP v1, v2c or v3.
- Notification type – Specify whether notifications may be sent as traps or (where supported) informs.
- Credentials – Enter security credentials for the Manager. For SNMP v1 or v2c it is the community string. For SNMP v3 it is an existing local user (for traps) or remote user (for informs).
- Engine ID – Specify the corresponding engine ID where a remote user is specified
5. Click Add host to finish setting up the notification host.
6. Click Review/apply and review pending changes. To apply these changes to the system, click Apply changes or click ‘X‘ to cancel.
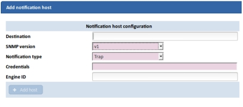
The SNMP Add/Edit notification host dialog
Defining SNMPv1/v2 communities
Access rights in SNMPv1 and SNMPv2 are managed by defining communities in the ConŞekil communities dialog, which is available after clicking Traditional access control. The community name is a type of shared password between the SNMP management station and the device. It is used to authenticate the SNMP management station.
Communities are only defined in SNMPv1 and v2 because SNMP v3 works with users instead of communities. The users belong to groups that have access rights assigned to them.
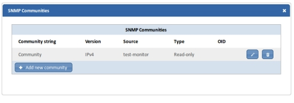
The SNMP Communities dialog for SNMP v1 and v2
Define SNMPv1/v2 communities
1. Click on the chassis and select the SNMP tab.
2. In the Traditional access control area, click ConŞekil communities. The SNMP Communities dialog displays.
3. To define a new community, click Add new community, or click to edit an existing community. The Add/Edit Community dialog displays
4. Enter or edit details for the community:
- Community string—Enter a secret/password string for the community to authenticate clients. The community string is case-sensitive and must contain 1–32 alphanumeric characters (no spaces), and the first character must be a letter.
- IP version—Specify whether this community allows access via IPv4 or IPv6.
- Source—You may restrict access to the community from certain sources, by specifying the source address, subnet or hostname.
- Type—Specify whether this community allows read-only or read-write access to clients.
- OID—You may restrict access to the community to part of the MIB tree by specifying the OID.
5. Click Add community to finish setting up the community.
6. Click Review/apply and review pending changes. To apply these changes to the system, click Apply changes or click ‘X‘ to cancel.
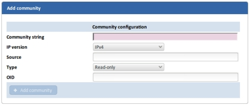
The Add community dialog for SNMP v1 and v2
Configuring SNMP v3
The recommended steps for configuring access to management information for SNMP v3 users are as follows:
1. Define the users and their access models.
2. Map any SNMP v1 communities to a security name.
3. Create groups.
4. Define the views that the group will be restricted to.
5. Define an access policy for the group.
Defining SNMP users
An SNMP user is defined by the login credentials (username, passwords, and authentication method), and by the context and scope in which it operates by association with a group and an Engine ID.
After a user is authenticated, it takes on the attributes of its group, and can then see or not see the views associated with this group. Groups enable network managers to assign access rights to specific features, or feature aspects, to an entire group of users instead of to a single user. A user can only be a member of a single group.
The SNMP Users dialog (shown below) enables the creation of SNMPv3 users. An SNMPv3 user is the combination of a user along with a method that is used to authenticate the user and a password. SNMP user login credentials are verified using the local database.
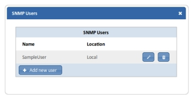
The SNMP Users dialog
Define an SNMP user
1. Click on the chassis and select the SNMP tab.
2. Under View-based access control, click ConŞekil users. The SNMP Users dialog displays.
3. To define a new user, click Add new user, or to edit an existing user click the icon for that user. The Add/Edit new user dialog displays
4. Enter or edit details for the user:
- User name—Specify a name for the user. Names consist of 1–32 alphanumeric characters, and must begin with a letter.
- Engine—Choose whether the user is a local user (most cases) or a remote user. If it is a remote user, you must also specify the corresponding remote Engine ID. An Engine ID consists of 10–64 hex digits.
- Authentication—Specify whether authentication is to be used, and if so whether to use MD5 or SHA (more secure). If authentication is in use, you must also specify a passphrase, which consists of 8–64 ASCII non-control characters. If editing an existing user, you may leave this field blank if you wish to keep the existing passphrase.
- Privacy— Specify whether encryption is to be used, and if so whether to use DES or AES (more secure). If encryption is in use, you must also specify a passphrase, which consists of 8–64 ASCII non-control characters. If editing an existing user, you may leave this field blank if you wish to keep the existing passphrase.
5. Click Add user to finish setting up the user.
6. Click Review/apply and review pending changes. To apply these changes to the system, click Apply changes or click ‘X‘ to cancel.
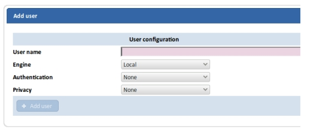
The SNMP Add user dialog
Mapping SNMPv1/v2 users to SecurityNames
Clients that connect using SNMPv1/v2 must be mapped onto a “security name” and added to a group, the same as SNMPv3 users.
The SNMP Communities (VACM) dialog, shown below, enables the mapping of a community string and a source IP or network address to a security name (user name).
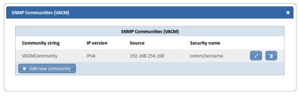
The SNMP Communities (VACM) dialog
Map SNMP v1 or v2 users to SecurityNames
1. Click on the chassis and select the SNMP tab.
2. Under View-based access control, click ConŞekil communities. The SNMP Communities (VACM) dialog displays.
3. To map a new user, click Add new community, or to edit an existing mapping click the icon for that user. The Add/Edit Community dialog displays.
4. Enter or edit details for the community mapping:
- Community string—Specify the community string. The community string is case-sensitive and must contain 1–32 alphanumeric characters (no spaces), and the first character must be a letter.
- IP version—Specify whether this community allows access via IPv4 or IPv6.
- Source—You may restrict access to the community from certain sources, by specifying the source address, subnet or hostname.
- Security name—Specify a security name (user name). The security name can be used later to add the user to a group, like SNMPv3.
5. Click Add community to finish setting up the community mapping.
6. Click Review/apply and review pending changes. To apply these changes to the system, click Apply changes or click ‘X‘ to cancel.
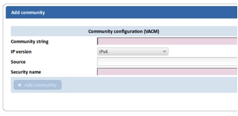
The SNMP Add community dialog for VACM
Creating SNMP groups
SNMPv3 provides for a way to control which events authorized and authenticated users can see and perform by associating each user with a group. A group is a label for a logical entity (combination of attributes). A group is operational only when it is associated with an SNMP user or an SNMP community. A group also has an attribute that tells if members should have read, write, and/or notify privileges for the view.
From the web UI, groups are configured using the SNMP Groups dialog, shown below.
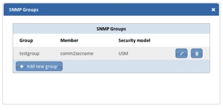
The SNMP Groups dialog
Create an SNMP group
1. Click on the chassis and select the SNMP tab.
2. Under View-based access control, click ConŞekil groups. The SNMP Groups dialog displays.
3. To define a new group, click Add new group, or to edit an existing community click the icon for that group. The Add/Edit group member dialog displays
4. Enter or edit details for the group:
- Group name – Enter a name for the group. Names must start with a letter and cannot be more than 32 alphanumeric characters long.
- Member – Member to add to the group (only one user can be added at a time). The member may be an existing local SNMP user or a security name assigned to an existing VACM-enabled SNMP community. The same member may belong to different groups with different security models. The membership will apply only when the specified security model is used for a request.
- Security model– Enter a security model for the group: SNMPv1, SNMPv2c, or SNMPv3 USM.
5. Click Add group to finish setting up the group.
6. Click Review/apply and review pending changes. To apply these changes to the system, click Apply changes or click ‘X‘ to cancel.

The SNMP Add/Edit group member dialog
Defining SNMP views
A view is a user-defined label for a collection of MIB tree subtrees. Each subtree ID is defined by the Object ID (OID) of the root of the relevant subtrees. In extreme cases, this subtree can be a leaf, only. Each subtree is either included or excluded in the view being defined.
Views are configured using the SNMP Views dialog, shown below.
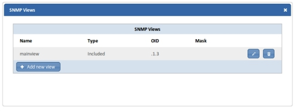
The SNMP Views dialog
Define an SNMP view
1. Click on the chassis and select the SNMP tab.
2. Under View-based access control, click ConŞekil views. The SNMP Views dialog displays.
3. To define a new view, click Add new view, or to edit an existing view click the edıt icon for that view. The Add/Edit view member dialog displays
4. Click Add new view. The Add view member window appears.
5. Enter or edit details for the view:
- Name – Specify a name for the view. Names consist of 1–32 alphanumeric characters, and must begin with a letter.
- View type– Specify whether the view contains the tree below the specified OID or everything else.
- OID – Specify the position in the management tree below which this view applies.
- Mask – Can be used to specify that only some of the sub-identifiers in the OID are to be matched. The mask can be used to define a view covering a particular row (or rows) in a table, by matching against the appropriate table index value but skipping the column sub-identifier.
6. Click Add view to finish setting up the view.
7. Click Review/apply and review pending changes. To apply these changes to the system, click Apply changes or click ‘X‘ to cancel.
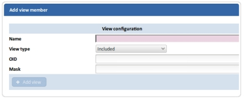
The SNMP Add/Edit view member dialog
Defining the group access policy
The group access policy defines the access rights per group and the minimum security model and security level required to access the group. The access options are:
- Read—Management access is read-only for the selected view. Otherwise, a user or a community associated with this group, is able to read all MIBs except those that control SNMP itself.
- Write—Management access is write for the selected view. Otherwise, a user or a community associated with this group, is able to write all MIBs except those that control SNMP itself.
- Notify—Sends only notifications with contents that is included in the SNMP view selected for notification. Otherwise,there is no restriction on the contents of the notifications.
Group access policies are configured using the SNMP Access Control List dialog, shown below.
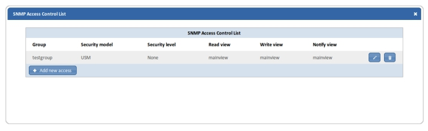
The SNMP Access Control List dialog
Define a group access policy
1. Click on the chassis and select the SNMP tab.
2. Under View-based access control, click ConŞekil access control list. The SNMP Access Control List dialog displays.
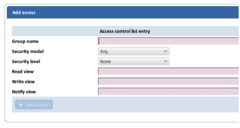
3. To define a new access policy, click Add new access, or to edit an existing access policy click the edit icon. The Add/Edit access dialog displays
4. Enter details for the group access policy:
- Group name—Specify the name of an existing group that will receive this access.
- Security model—Specify the security model for the view, either any security model, SNMPv1, SNMPv2c, SNMPv3 USM. Access will only be granted if the security model matches the request.
- Security level—Specify the security level for the view. Access will only be granted if the security of the request meets the minimum requirement specified here. The order is: None (lowest), Authentication only, Authentication + Privacy (highest).
- Read view—Specify the names of existing views to which get requests will be mapped. If no access is required,
- create a ‘None’ view with no access to any MIB and specify it here.
- Write view—Specify the names of existing views to which set requests will be mapped. If no access is required, create a ‘None’ view with no access to any MIB and specify it here.
- Notify view—Specify the names of existing views to which notify requests will be mapped. If no access is required, create a ‘None’ view with no access to any MIB and specify it here.
5. Click Add view to finish setting up the group access policy.
6. Click Review/apply and review pending changes. To apply these changes to the system, click Apply changes or click ‘X‘ to cancel.
Leave A Comment?